This procedure should be used to transfer a payment that was originally applied to the wrong account. This two stage process is required to insure proper application of the payment in environments where the payment will be distributed over multiple services.
Step 1
![]() Double click on the MasterTrak Utility Billing icon on the desktop.
Double click on the MasterTrak Utility Billing icon on the desktop.
Step 2
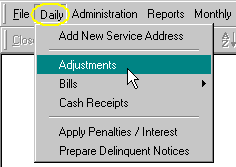
At the menu on top of the screen, click on the Daily menu option. Scroll down to the Adjustments option and select it. The system will display the following window.
Step 3
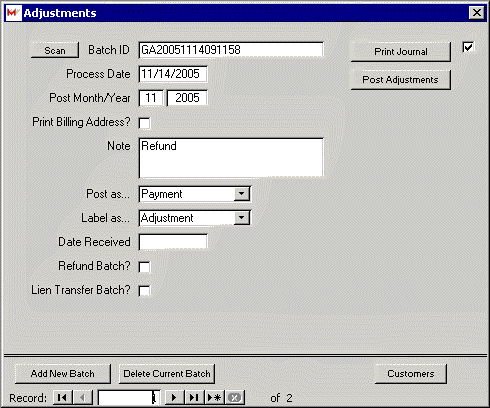
Enter the Adjustments batch header. The system allows the user to process multiple batches simultaneously. Care must be take to be sure the customer transactions are added to the correct batch if multiple batches exist.
Batch ID: Enter a unique batch ID or allow the system to generate a batch ID number automatically.
Process Date: Enter the process date for the batch. This date will be used by the system as the process date assigned to each transaction on the customer transaction history. If the user double-clicks on the field, the system will automatically display the current date as the process date. When the process date is entered, the system will automatically generate the Batch ID if one has not already been entered.
Post Month/Year: Enter the post month and post year in which the general ledger activity for this batch should posted. The system will accept any month between 1 and 12 and any year. The post month and year are not required to match the process date, but it is recommended that these fields match if the general ledger is running on a calendar year.
Print Billing Address?: If this box is checked, the system will print the customer’s billing name and address on the Adjustments Journal.
Post As – Use the drop down arrow and select Payment.
Label As – Use the drop down arrow and select Payment.
Date Received – Enter the date receieved.
Due Date – Only used when Bill is selected as the Post As type. Enter the bill due date.
Lien Transfer Batch – Used only when processing Liens.
To proceed to the next step, select the ![]() button. If the user has just added a new batch record, the system will automatically display the next window if the user selects Enter or Tab on the Notes field.
button. If the user has just added a new batch record, the system will automatically display the next window if the user selects Enter or Tab on the Notes field.
Step 4
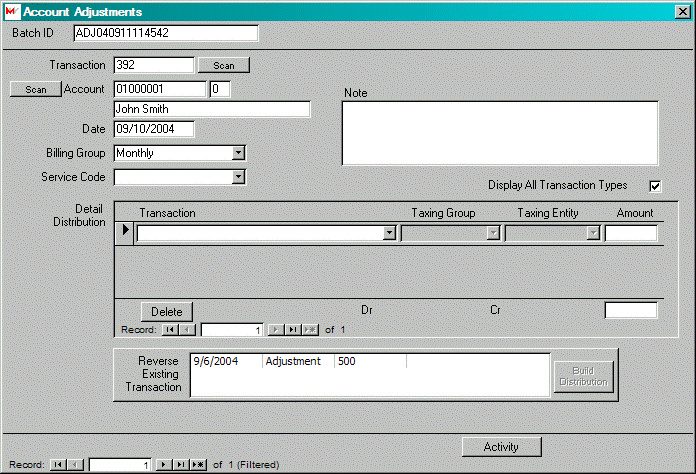
Enter the transaction for a selected customer.
Account: Enter the account number and account suffix. The user can scan the customer master table to select the correct account number it is not known.
Billing Group: Enter the billing group for the adjustment from the list provided. The system will accept input that is on the list. If the customer has multiple billing groups, it is critical that this field be assigned correctly.
Service Code: Leave blank.
Note: (Optional) Enter a note that is appropriate for this transaction.
Detail Distribution: From the Reverse Existing Transaction section, select the appropriate payment to be reversed. Once the transaction has been selected, select Build Distribution. The system will display the appropriate transaction(s) to reverse the payment.
Step 5
Click Print Journal on the batch header window. This will print a detailed journal of the adjustments, including a listing of the payment distribution. A general ledger summary distribution journal is also prepared.
Step 6
To post the adjustments to customer accounts and the general ledger, Click Post Adjustments on the batch header window. When posting procedure is completed, the system will display a message.
At this point, the payment has been removed from the original account. The next steps
Step 7
![]() Double click on the MasterTrak Utility Billing icon on the desktop.
Double click on the MasterTrak Utility Billing icon on the desktop.
Step 8
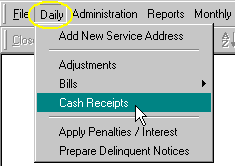
At the menu on top of the screen, click on the Daily menu option. Scroll down to the Cash Receipts option and select it.
Step 9
Enter the cash receipts batch header. The system allows the user to process multiple batches simultaneously. Care must be take to be sure the customer transactions are added to the correct batch if multiple batches exist.
Batch ID: Enter a unique batch ID or allow the system to generate a batch ID number automatically.
Process Date: Enter the process date for the batch. This date will be used by the system as the process date assigned to each transaction on the customer transaction history. If the user double-clicks on the field, the system will automatically display the current date as the process date. When the process date is entered, the system will automatically generate the Batch ID if one has not already been entered.
Billing Group: Select the billing group from list provided. Receipts are entered by billing group. Only a valid billing group will be accepted by the system.
Post Month/Year: Enter the post month and post year in which the general ledger activity for this batch should posted. The system will accept any month between 1 and 12 and any year. The post month and year are not required to match the process date, but it is recommended that these fields match if the general ledger is running on a calendar year.
Note: Enter any note that should be recorded on each customer transaction.
To proceed to the next step, select the ![]() button. If the user has just added a new batch record, the system will automatically display the next window if the user selects Enter or Tab on the Notes field.
button. If the user has just added a new batch record, the system will automatically display the next window if the user selects Enter or Tab on the Notes field.
Step 10
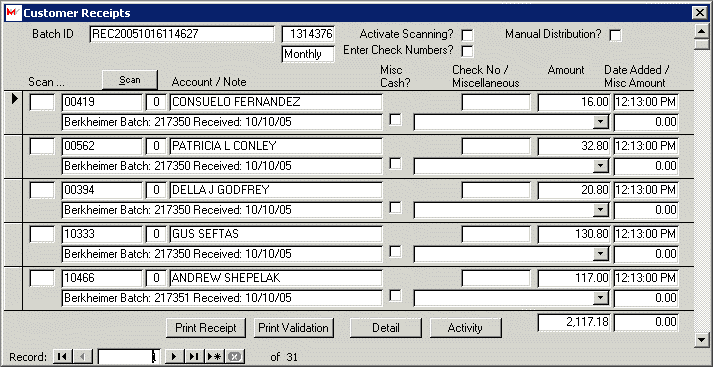
Enter the cash receipt transactions. Each transaction represents an individual customer cash receipt.
Account: Enter the account number and account suffix. The user can scan the customer master table to select the correct account number it is not known.
Check No: Enter the check number associated with the cash receipt. When the window is initially displayed, the system will skip the check number field. If the user is going to enter the check numbers, then the user should check the Enter Check Numbers? box. If this box is checked, the system will stop at the check number field.
Amount: Enter the amount of the cash receipt. When the account number and account suffix are entered, the system will display the balance due for the customer. If the amount displayed matches the actual receipt, select Enter, and begin the next transaction. If the amount does not match the actual receipt, enter the correct amount and then select Enter.
Note: Enter a note that is specific to this customer’s transaction. The note will be saved with the customer transaction.
Click the Add button to enter another transaction. Continue this process until all transactions for the batch have been entered. After entering all of your cash receipts, select Close to return to the Batch Entry screen.
Step 11
Click Print Journal on the batch header window. This will print a detailed journal of the cash receipts, including a listing of the payment distribution. A general ledger summary distribution journal is also prepared.
Step 12
To post the cash receipts to customer accounts and the general ledger, Click Post Receipts on the batch header window. When posting procedure is completed, the system will display a message.