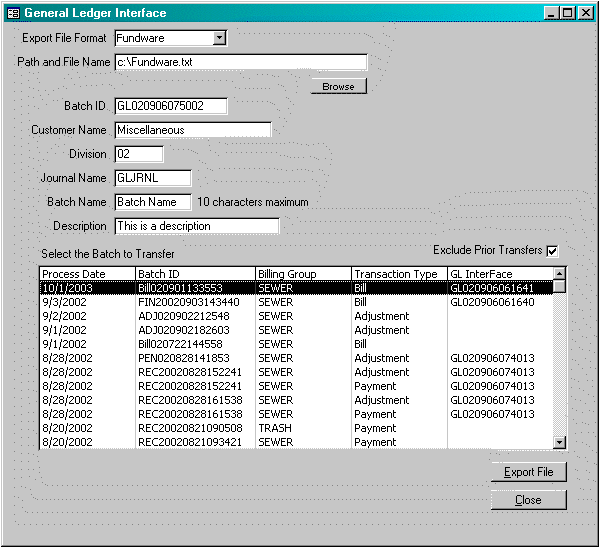
Menu Path: Utilities > General Ledger Interface
This function allows the user to create a file containing the general ledger activity that can be imported into a 3rd-party general ledger application. The export files match the format specified by the 3rd-party application. The system will automatically transfer all activity that has not been transferred before. After the export file is created, the system will mark the transactions that have been exported.

Path and File Name: Enter the path and file name for the export file. The system will accept any path that exists and any file name. The user may select the ![]() to scan the folders on the PC.
to scan the folders on the PC.
(Fundware Only) The import file name must be located in the Fundware data directory and the name should have the format GL0xxx.Y, where xxx is the last three digits of the TTY number at the top of the screen.
 Export File Format: The system can prepare export files for a number of different 3rd-Party applications. Select the correct file format form the list provided.
(MasterTrak Only) With the MasterTrak interface, an export file is not created, but the data is transferred directly to the Year-to-Date General Ledger table.
Batch ID: When general ledger activity is exported, the system will stamp each record with the batch number entered. This will provide a process for identifying each batch in the future. When the window is first displayed, the system automatically displays a unique batch id.
Customer Name: (QuickBooks Only) When the export file being created is for Quickbooks, the user must indicate the customer name that represents a miscellaneous customer within Quickbooks. All activity will be posted to this customer.
Division: (Fundware Only) Enter the division for the batch.
Journal Name: (Fundware Only) Enter the journal name. This name must exist in the fundware environment.
Batch Name: (Fundware Only) Enter up to ten (10) characters for the batch name. This field should be entered only if the Fundware setup allows imported transactions to be saved.
Description: (Fundware Only) Enter up to thirty (30) characters for a description. This field should be entered only if the Fundware setup allows imported transactions to be saved.
Select the Batch To Transfer: From the list provided, select the batch(es) to be included in the transfer. The user may select any number of batches using standard list box procedures. The only limitation to selection is that for Munis and Fundware interfaces, all batches must have the same process date.
Process Date: The date the batch was posted in MasterTrak.
Batch ID: The batch ID originally assigned by MasterTrak.
Billing Group: The billing group of the batch.
Transaction Type: The type is Bill, Payment or Adjustment
GL Interface: If the batch has been transferred before, the batch assigned to the transferred will be assigned.
Include/Exclude Prior Transfers: When this window initially appears, the list of batches available for transfer is limited to those batches that have never been transferred before. If this box is checked, the system will include all batches, even those that have already been transferred.
![]() When this button is selected, the system will generate the requested export file. Once the export file has been created, the system will display the following window. If the user does not respond ‘yes’, then the transactions will be transferred again the next time the export file is created.
When this button is selected, the system will generate the requested export file. Once the export file has been created, the system will display the following window. If the user does not respond ‘yes’, then the transactions will be transferred again the next time the export file is created.

As a reminder, if the user responds ‘No’, then the following window is displayed.

![]() If the user selects this button, the system will close this function.
If the user selects this button, the system will close this function.