Menu Path: Customer > Meters
![]() Each of the tabs across the top of the window below are active to assist the user is reviewing the help documentation. To change the view of the window, select the tab or button of interest. To return to this window, select the Back button on the menubar.
Each of the tabs across the top of the window below are active to assist the user is reviewing the help documentation. To change the view of the window, select the tab or button of interest. To return to this window, select the Back button on the menubar.
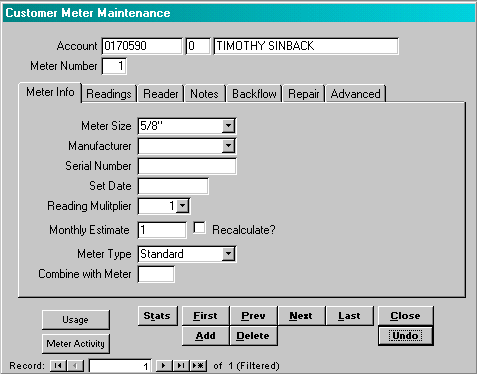
Meter Size: Enter the meter size from the list provided. The system uses this meter size to determine the minimum charge as defined on the Services table.
Manufacturer: Enter the meter manufacturer from the list provided. This list is maintained by the user in the Codes table. This field is for documentation only and is not used by the system.
Serial Number: Enter the serial number assigned to the meter. The user can locate the customer account based upon this serial number.
Set Date: Enter the original installation date of the meter in this account.
Reading Multiplier: Enter the multiplier factor associated with the meter. Typically, the value of this field is 1.
Monthly Estimate: Enter the estimated monthly usage for this meter. The system uses this usage if an estimated reading is generated by the system.
Recalculate?: If this box is checked, the system will automatically calculate the Monthly Estimate as part of the Close Month procedure. If the system calculates the estimated usage, it will use the period specified in the Parameters table.
 Meter Type: Enter the type of meter for billing from the list. The system performs the following based upon the type selected. Standard: Meter usage stands alone. Compound: Meter usage is added to the meter specified below. Deduct: Meter usage is subtracted from the meter specified below.
Combine with Meter: If the meter is defined as either a Deduct or Compound meter, enter the meter number that the usage should be combined with to determine the total usage. The total usage is then used as the basis for the service charges. If the meter type is defined as Standard, the field should be left blank. Note: The system considers ‘0’ a valid meter number, so do not use ‘0’ instead of leaving the field blank.
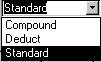
The system maintains three sets of the information below on each meter; previous, current and last. The previous and current readings are used to calculate charges and print the bills. The last reading is where the most recent (next) reading is entered. By having three reading sets, it is possible to be processing bills while entering a reading for the next bill cycle.
Reading: Enter the reading as recorded.
 Reading Type: Enter the reading type from the list provided. This field is used for documentation purposes only.
Reading Date: Enter the reading date in the format mm/dd/yyyy.
Usage: The system will calculate the usage based upon the readings entered.
Meter Note: Enter a note from the list of available notes. The user maintains the list of meter notes in the Codes table.
![]() If the user selects this button, the system will display a history of usage along with a graph of the usage for the past 36 periods.
If the user selects this button, the system will display a history of usage along with a graph of the usage for the past 36 periods.
![]() If the meter inventory section of the application is active, this button will display the history of meter activity.
If the meter inventory section of the application is active, this button will display the history of meter activity.

The information on this window is required in those situations where automated readers are used to collect readings. The information is transferred to the meter readers using the Import and Export Reader functions.
ECR Location: Enter the description of the outside reader.
ECR Identifier: Enter the unique serial number or code that the reader uses to identify the account. In some instances, this may be the same as the serial number on the meter. However, the system does not use the serial number field as the reader identifier.
Reader Notes: Enter any notes that should be transferred to the reader; e.g. mean dog.
Reader Type: Enter the reader type from the list provided. The user maintains the list of reader types in the Codes table.
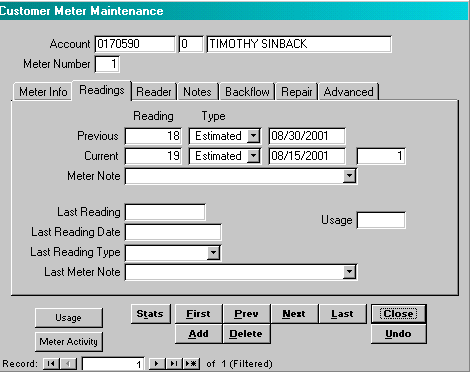
Note: Enter any note that is appropriate for this meter.
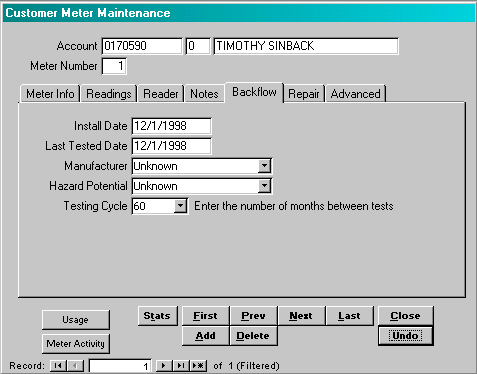
This window is appropriate for those installations that monitor backflow units. All the information on this window is optional.
Install Date: Enter the original installation date in the format mm/dd/yyyy.
Last Tested Date: Enter the date the unit was last tested in the format mm/dd/yyyy.
Manufacturer: Enter the manufacturer from the list provided. The user maintains the list of manufacturers on the Codes table.
Hazard Potential: Enter the hazard potential from the list provided. The user maintains the list of hazard potentials on the Codes table.
Testing Cycle: Enter the testing cycle from the list provided. The user maintains the list of testing cycle on the Codes table. The system uses this field in combination with the Last Tested Date to determine the next testing date.
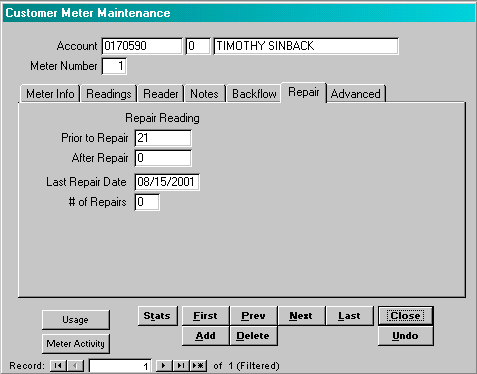
In those instances where a meter is replaced, there is a final reading on the old meter and a staring reading on the new meter. The user may enter these two readings and the system will calculate usage based upon the two sets of readings. Both sets of readings will be stored in the meter history table. If the Service Calls function is active, these fields will be updated automatically if the meter repair is performed as part of a service call.
If the user does not wish to use this process, then the calculated usage must be manually entered. In this instance, the current reading should be entered as the new meter’s starting reading.
Prior to Repair Reading: Enter the final reading on the old meter.
After Repair Reading: Enter the starting reading on the new meter.
Last Repair Date: Enter the date of the last repair.
# of Repairs: This is typically a system-maintained field and indicates the number of times the meter has been repaired.
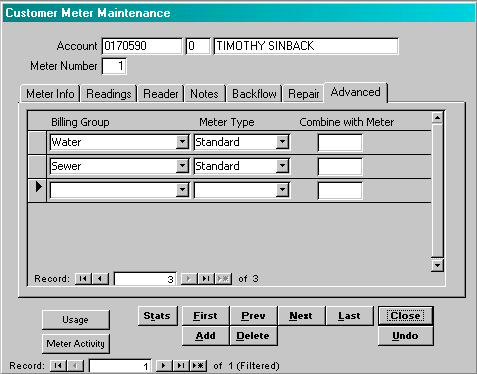
This window is required in those instances where the same meter information is used to generate charges in different services. Further, it is only necessary to complete this information on accounts that have compound or deduct meters. In all other instances, this window should be left blank.
The following scenario is provided to clarify this window. The authority in question bills both water a sewer based upon the same meter readings. In one account, the customer has two meters, the first meter monitors water coming into the house and the second meter (deduct meter) monitors water being used to fill the swimming pool and water the lawn. In this situation, Meter 1 represents the water usage and Meter 1 less Meter 2 represents the sewage usage. The following two windows display how this window would be entered for both meters.
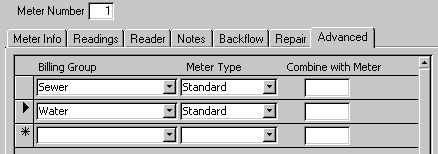

Billing Group: Enter the billing group from the list maintained in the Billing Group table.
Meter Type: Enter the meter type from the list provided. Typically, the first meter will be a standard meter and the second meter will be a deduct or compound meter.
Combine With Meter: If the meter is defined as either a Deduct or Compound meter, enter the meter number that the usage should be combined with to determine the total usage. The total usage is then used as the basis for the service charges. If the meter type is defined as Standard, the field should be left blank. Note: The system considers ‘0’ a valid meter number, so do not use ‘0’ instead of leaving the field blank.

This window displays the meter usage history.
Reading Date: This is the reading date for the record.
Previous: This is the reading from the previous reading date.
Current: This is the current reading taken on the reading date.
Type: This is the type of reading recorded as the current reading.
Usage: Typically, this is calculated by subtracting the previous reading from the current reading. In some instances, the user can manually change the usage, so the usage may not be equivalent to the prior calculation.
Note: This is the meter note that was entered when the current reading was taken.