Menu Path: Administration > Services
Services represent the various types of charges that can be associated with a customer. A new service is created for each type of charge and/or billing rate that may exist. Depending upon the type of service, different tabs may appear on the form. Select the tab of each of the following images to review the actual windows.
The charge is calculated based a single rate multiplied by the number of units on the Services table.

The charge is calculated based upon the customerís usage and a multi-step rate schedule. The schedule takes into account minimum charges, charges based upon meter size, and different rates for different levels of consumption.

The charge is calculated based upon multiplying a rate by the calculated charges for the selected balance group.

The charge is calculated by multiplying the consumption by a single rate. It does not account for minimum charges, variations by meter size or usage.

The charge is calculated in two steps. The first step is to calculate the Ďdemandí factor based upon the calculation specified and multiply that factor by the base demand charge. The usage is then charged based upon charge tables.

The charge is calculated based upon multiplying a rate by the calculated charges for the selected service.

The service is specifically used for creating and processing a loan, equivalent to a mortgage loan, including the calculation of interest earned.

The charge is calculated based upon a calling area rate schedule and log of calls made.

This service is available to provide the option of applying penalties and interest to Transaction Types that are not specifically related to services.

![]()
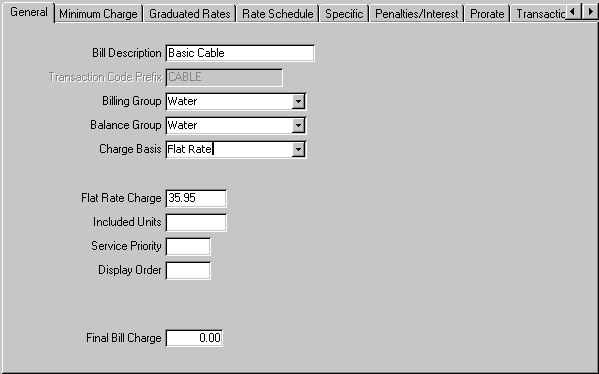
Description: Enter the description of the service. This desciption will be displayed on forms and reports when the service is referenced.
Bill Description: Enter the description that is printed on the bill. This description is typically short and concise to optimize space on the bill.
Transaction Code Prefix: The system automatically creates a set of transaction codes associated with the service. These transaction codes provide the link to the general ledger for the various functions associated with each service; e.g. bill, payment, sales tax.
Billing Group: Enter the billing group for the service.
Balance Group: Enter the balance group for the service.
Charge Basis: The system supports the following charge types:
Consumption: Service charge is calculated based upon applying a rate schedule to a consumption. Typically this service is associated with meter readings for water, sewer, electricity, etc.
Flat Rate: Service charge is a single flat rate charge.
Loan: The system has the capability to maintain and process loans. The user assigns the loan amount, monthly payment and interest rate, and the system will automatically track loan payments and loan interest revenue.
Misc Charges Only: The use can create transaction codes representing charges that are not necessarily related to services; NSF Check charge, Shut-Off charge, Turn-On charge. If the user wishes to apply penalties and/or interest on these charges, the user must assign these transactions to a service. Assigning the transaction to a service allows the user to define the penalty/interest rules.
Telephone: Service charge is based upon applying a rate schedule to a log of calls. Each call may have a flat charge for the call and/or a per unit (minutes) charge.
Note: If a given account has a mix of billing group penalty rules and by service penalty rules the system will calculate all penalties for each different rule and then add them together.
Flat Rate Charge: (Flat Rate Only) Enter the amount that is the flat rate charge for this service.
Base Charge: (Telephone Only) Enter the amount that is the base charge for this service.
Included Units: (Telephone Only) If the service is a telephone service, enter the number of units that are included as part of the base charge.
Service Priority: (Telephone Only) The user must indicate the order in which services should be evaluated. For example, all local call services should be evaluated before long distance services. The actual number that is entered is not critical, but the value of the number is. The lower the number, the higher the priority.
Display Order: The system will use this value to determine the order of displaying the service charges on the bill summary and on the bill.
Final Bill Charge: Enter the amount that represent any charge that is applied when the customerís account is closed. This amount will automatically be added to the calculated charge and is included in the total amount. It will be credited to the service revenue account.
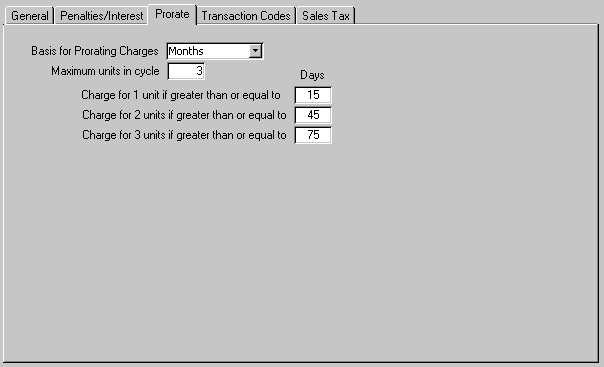
If the customerís account is opened during the billing period, the system can pro-rate the charges for the first billing period based upon established rules.
![]() Basis for Prorating Charges: The pro-rating process can be based upon days or months. If the months is used, the user must enter the number days that will indicate what portion of the charge should be considered applicable. If days.is used, the system will calculate the proportion to be charged based upon the number of days during the service period that the customerís account was active over the total number of days in the service period.
Basis for Prorating Charges: The pro-rating process can be based upon days or months. If the months is used, the user must enter the number days that will indicate what portion of the charge should be considered applicable. If days.is used, the system will calculate the proportion to be charged based upon the number of days during the service period that the customerís account was active over the total number of days in the service period.
Maximum Units in Cycle: If months is used, this indicates the number of periods to be considered in the cycle. For each unit, the user should indicate the number of days that will qualify for the next unit.
 If days is used, enter the days around the Maximum Units in Cycle that should be considered one unit. This will eliminate the issue of the system rounding a charge when the billing period is not equal to the Maximum Units in Cycle.
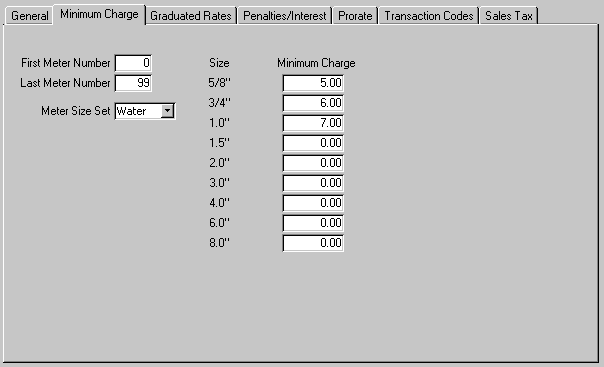
This window allows the user to define minimum service charges based upon meter size.
First Meter No: The system has the capability of maintaining meters for different services (gas, water or electric) for each customer. This field indicates the first meter number that is associated with this service. For example, if the system bills both water and electric, the user may define meter numbers 1 through 99 as water and meter number 100 through 199 as electric.
Last Meter No: The system has the capability of maintaining meters for different services (gas, water or electric) for each customer. This field indicates the last meter number that is associated with this service. For example, if the system bills both water and electric, the user may define meter numbers 1 through 99 as water and meter number 100 through 199 as electric.
Meter Size Set: The system maintains a set of standard meter sizes for water, gas and electric meters. The user selects the set that is appropriate for the service.
Minimum Charge: Enter the amount that should be charged if the customer has this size meter. Be sure the charge amount is entered for every meter size that may exist in the system.
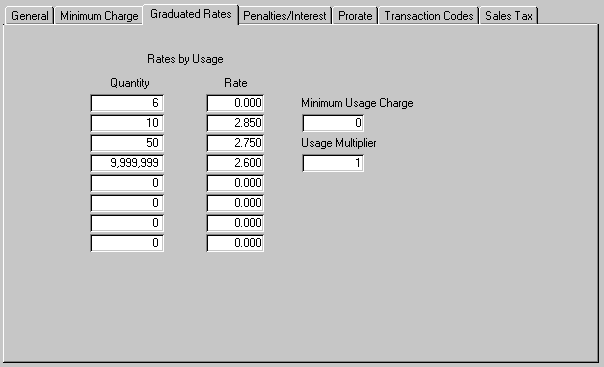
This window allows the user to define a graduated schedule for consumption charges.
Quantity: Enter the quantity for each level of the rate schedule.
Rate: Enter the rate per unit that will be charged for each level.
Minimum Usage Charge: Enter the amount that will charged as the minimum for the service. For example, if the consumption calculation amount is less than this amount, the system will set the charge amount to the amount that is larger.
Usage Multiplier: Enter any factor that should be used to convert the consumption unit measure to the unit measure of rate. For example, the user may collect consumption in thousands of gallons and establish rates based upon eduís. Typically this field is set to 1.
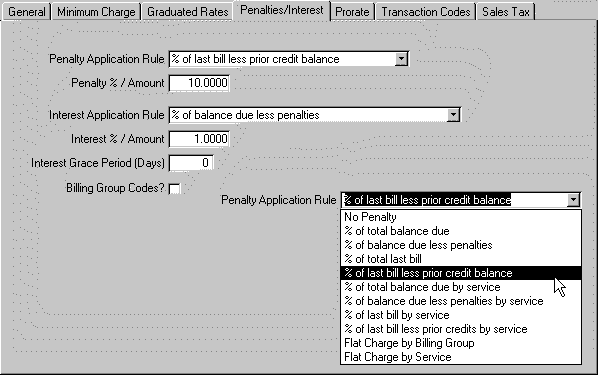
Penalty Application Rule: Select the rule from the list provided that is to be used to apply penalties to unpaid bills. The rules will process as follows:
% of Total Balance Due: The system will apply the penalty percent to the total balance due for the billing group.
% of Balance Due Less Penalties The system calculates the principle balance due for the billing group and applies the penalty percent to that amount. Any outstanding penalty amounts are not included in the calculation.
% of Total Last Bill: The system will apply the penalty percent to the total amount of the last bill, or current bill if one is being prepared, regardless of any prior balance on the account.
% of Last Bill Less Prior Credit Balance: The system will subtract any credit balance on the account from the last bill amount, or current bill if one is being prepared, and then calculate the penalty amount.
% of Total Balance Due by Service: The system will apply the penalty to any outstanding balance by service. If one service has a credit balance and one service has a debit balance, the system will ignore the service with the credit balance and apply a penalty to the service with the debit balance. To insure that credit balances are properly distributed, it may be necessary to run Transfer Credit Balances prior to applying penalties.
% of Balance Due less Penalties by Service: The system calculates the principle balance for each service Tand calculates the penalty by service. Any outstanding penalty and/or interest amount is ignored. If one service has a credit balance and one service has a debit balance, the system will ignore the service with the credit balance and apply a penalty to the service with the debit balance. To insure that credit balances are properly distributed, it may be necessary to run Transfer Credit Balances prior to applying penalties.
% of Last Bill by Service: The will calculate the charges for each service on the last bill, or current bill if one is being prepared, and then calculate the penalty for each service individually. . If one service has a credit balance and one service has a debit balance, the system will ignore the service with the credit balance and apply a penalty to the service with the debit balance. To insure that credit balances are properly distributed, it may be necessary to run Transfer Credit Balances prior to applying penalties.
% of Last Bill Less Prior Credits By Service: The will calculate the charges for each service on the last bill, or current bill if one is being prepared, subtract any credit balance by service, and then calculate the penalty for each service individually. . If one service has a credit balance and one service has a debit balance, the system will ignore the service with the credit balance and apply a penalty to the service with the debit balance. To insure that credit balances are properly distributed, it may be necessary to run Transfer Credit Balances prior to applying penalties.
Flat Charge by Billing Group: The system will apply one flat charge for the Billing Group if an outstanding balance is found. If more than one flat charge is specified, the system will charge the highest flat charge found on the services applicable for the account.
Flat Charge by Service: The system will apply the flat charge specified for each service if that service has a debit balance. If one service has a credit balance and one service has a debit balance, the system will ignore the service with the credit balance and apply a penalty to the service with the debit balance. To insure that credit balances are properly distributed, it may be necessary to run Transfer Credit Balances prior to applying penalties.
Penalty % / Amount: Based upon the rule selected, enter the amount or percent that is appropriate.
Interest Application Rule: Select the rule from the list provided that is to be used to apply interest
Interest % / Amount: Based upon the rule selected, enter the amount or percent that is appropriate.
Interest Grace Period: Enter the number days from the billing date that the system should wait before applying the interest. This value is used only as a estimate. The user determines the actual dates and grace period to be used when applying interest.
Billing Group Codes: Some the penalty rules are not applied to specific services, but rather to the total billing group. In that instance, the system needs to know what transaction codes should be used to post the penalty adjustment. If this box is checked, the system will apply all penalties for this account to the transaction codes associated with this service. If more than one service has this box checked, the system will use the first service it finds. It will also use the penalty percent/amount associated with this service for the entire balance.
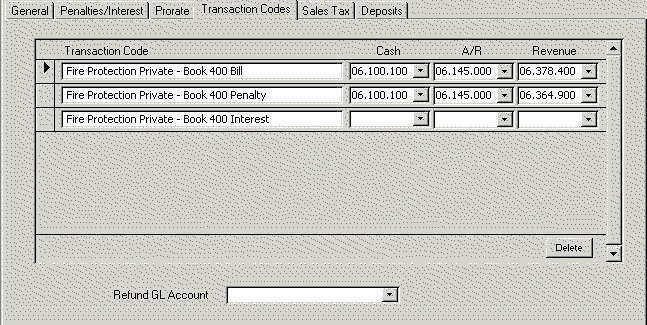
Transaction Code: Enter the transaction code for the service. These transaction codes are actually created by the system when the service is originally created.
Cash: Enter the general ledger account that represents the cash account.
A/R: Enter the general ledger account that represents the accounts receivable account. If the system should be reporting general ledger activity on a cash basis rather than accrual, the user should enter the revenue account in this field.
Revenue: Enter the general ledger account that represents the revenue account.
![]() The user may delete transaction codes that are not valid. However, the user must be very careful not to delete any transaction codes that have ever been used by the system. Deleting active transaction codes will cause unpredictable results.
The user may delete transaction codes that are not valid. However, the user must be very careful not to delete any transaction codes that have ever been used by the system. Deleting active transaction codes will cause unpredictable results.
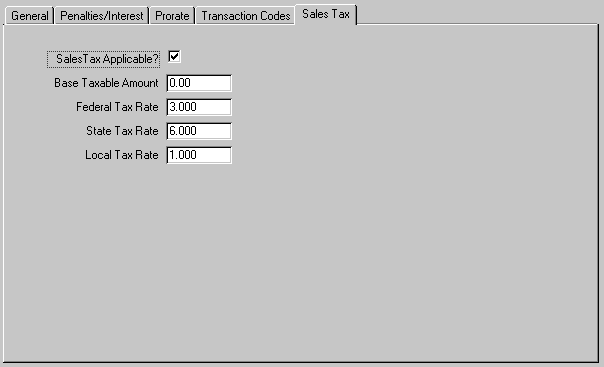
This window allows the user to enter applicable sales tax information.
Sales Tax Applicable?: Check this box if sales tax is applicable for this service. If the box is not checked, the remaining fields may be left blank.
Base Taxable Amount: In the situation where the total calculated charge is not taxable, enter the amount of the service that is considered taxable. If the total service is taxable, this field should be set to zero (0).
Federal Tax Rate: Enter the percent representing the federal sales tax rate. This amount will be itemized on the bill.
State Tax Rate: Enter the percent representing the sate sales tax rate. This amount will be itemized on the bill.
Local Tax Rate: Enter the percent representing the local sales tax rate. This amount will be itemized on the bill.
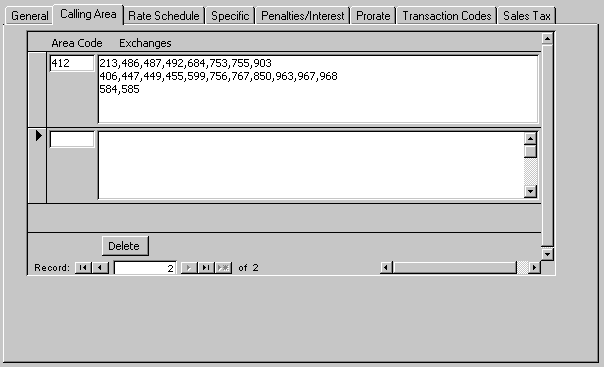
This window allows the user to define the area codes that are considered part of the calling area for this service. The user can then define a rate schedule for the calling area vs. non-calling area.
Area Code: Enter the area code.
Exchanges: Enter the exchanges that are associated with the calling area in the area code. When entering the exchanges, the following rules apply;
ō Each exchange or group of exchanges must be separated by a comma (,): for example, 486,492,767. Any other punctuation (e.g. semicolons, periods) found in the list of exchanges will be interpreted as an error.
ō If there are a number of exchanges that are sequential, the continuous sequence of exchanges may be entered individually or the sequence of exchanges may be entered as a group by entering the first exchange and the last exchange, separated by a "-": for example, 486, 753-756,903.
ō Any spaces entered will be ignored.
ō The user may select ENTER any number of times to make the information more readable. ENTER will be ignored by the system.
![]() If the user wishes to delete an area code from the list, the small delete button must be selected. If the large delete button at the bottom of the screen is selected, the total record will be deleted.
If the user wishes to delete an area code from the list, the small delete button must be selected. If the large delete button at the bottom of the screen is selected, the total record will be deleted.
![]() The system provides the user with the capability to copy calling area records that have been entered for another service to the current service. To use this function, select the service that is to be used as the source from the list provided and the select the COPY FROM button. The system will display the records after they have been copied. If some of the area codes in the source service already exist in the current service, the system will display a message and abort the process.
The system provides the user with the capability to copy calling area records that have been entered for another service to the current service. To use this function, select the service that is to be used as the source from the list provided and the select the COPY FROM button. The system will display the records after they have been copied. If some of the area codes in the source service already exist in the current service, the system will display a message and abort the process.
As an alternative, the user may use the standard COPY/Paste feature of Windows to transfer exchange information. The system will not permit a total record to be transferred. Only the fields may be transferred.
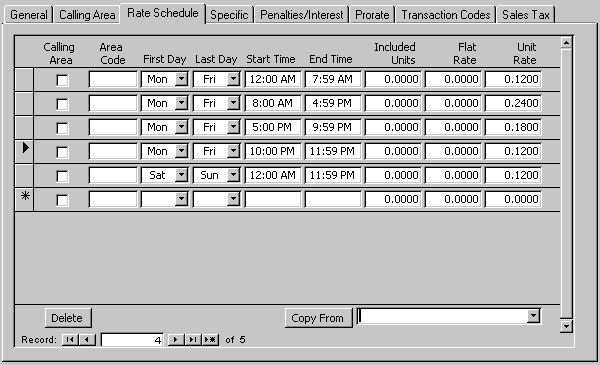
Calling Area: Check this box to indicate whether this record relates to the calling area exchanges or the non-calling area exchanges.
Area Code: If the rate applies to a specific area code, enter the area code. If the rate applies to all area codes, the field should be left blank.
First Day: Enter the first day the rate is applicable. This would allow the user to specify different rates for different days of the week.
Last Day: Enter the last day the rate is applicable. This would allow the user to specify different rates for different days of the week.
Start Time: Enter the first minute of the day that the rate applies. Be sure to enter the starting and ending times so that the times do not overlap. The times should be entered such that there is no day cross-over. For example, if the rate is defined as 10pm through 8am, two records should be entered; one for 10:00pm through 11:59pm and 12:00am through 7:59am.
End Time: Enter the last minute of the day that the rate applies. Be sure to enter the starting and ending times so that the times do not overlap. Typically the End Time should be entered as the last minute of the prior hour; e.g. ending time of 12:00am should be entered as 11:59pm. The times should be entered such that there is no day cross-over. For example, if the rate is defined as 10pm through 8am, two records should be entered; one for 10:00pm through 11:59pm and 12:00am through 7:59am.
Included Units: Enter the number of units that are included without charge for this rate.
Flat Rate: Enter the charge per call for this time period. If there is no flat charge, then the field should be set to zero.
Unit Rate: Enter the charge per unit (minute) for this time period. Note: When the duration of a call is calculated, all calls will be rounded up to the nearest minute.
![]() If the user wishes to delete an area code from the list, the small delete button must be selected. If the large delete button at the bottom of the screen is selected, the total record will be deleted.
If the user wishes to delete an area code from the list, the small delete button must be selected. If the large delete button at the bottom of the screen is selected, the total record will be deleted.
![]() The system provides the user with the capability to copy rate schedule records that have been entered for another service to the current service. To use this function, select the service that is to be used as the source from the list provided and the select the COPY FROM button. The system will display the records after they have been copied.
The system provides the user with the capability to copy rate schedule records that have been entered for another service to the current service. To use this function, select the service that is to be used as the source from the list provided and the select the COPY FROM button. The system will display the records after they have been copied.
Because of the structure of the form, the user may not user the standard COPY/PASTE feature of Windows to transfer records from another service.
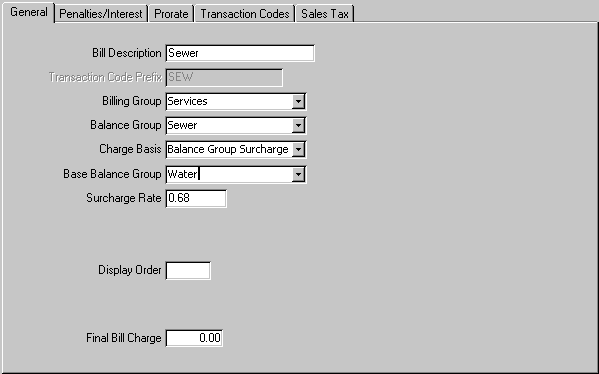
Description: Enter the description of the service. This desciption will be displayed on forms and reports when the service is referenced.
Bill Description: Enter the description that is printed on the bill. This description is typically short and concise to optimize space on the bill.
Transaction Code Prefix: The system automatically creates a set of transaction codes associated with the service. These transaction codes provide the link to the general ledger for the various functions associated with each service; e.g. bill, payment, sales tax.
Billing Group: Enter the billing group for the service.
Balance Group: Enter the balance group for the service.
Charge Basis: Select the Balance Group Surcharge. With this calculation, the system calculates all charges associated with the selected balance group and then applies the surcharge to the total of the balance group charges.
Base Balance Group: Select the balance group from the list provided. The list will include all balance groups that are included in the selected billing group.
Surcharge Rate: Enter the surcharge rate that should be applied.
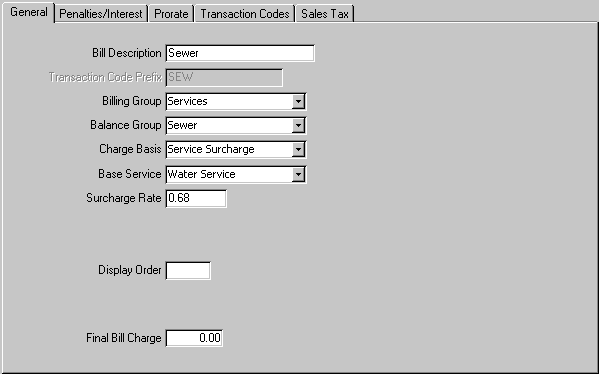
Description: Enter the description of the service. This desciption will be displayed on forms and reports when the service is referenced.
Bill Description: Enter the description that is printed on the bill. This description is typically short and concise to optimize space on the bill.
Transaction Code Prefix: The system automatically creates a set of transaction codes associated with the service. These transaction codes provide the link to the general ledger for the various functions associated with each service; e.g. bill, payment, sales tax.
Billing Group: Enter the billing group for the service.
Balance Group: Enter the balance group for the service.
Charge Basis: Select the Service Surcharge. With this calculation, the system calculates charge associated with the selected service and then applies the surcharge to the total of the service charges.
Base Balance Group: Select the servicefrom the list provided. The list will include all services are included in the selected billing group.
Surcharge Rate: Enter the surcharge rate that should be applied.
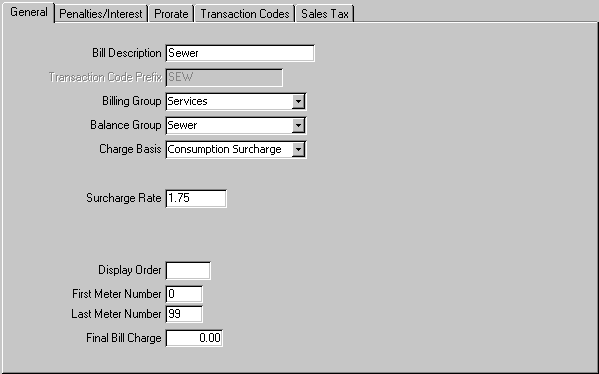
Description: Enter the description of the service. This desciption will be displayed on forms and reports when the service is referenced.
Bill Description: Enter the description that is printed on the bill. This description is typically short and concise to optimize space on the bill.
Transaction Code Prefix: The system automatically creates a set of transaction codes associated with the service. These transaction codes provide the link to the general ledger for the various functions associated with each service; e.g. bill, payment, sales tax.
Billing Group: Enter the billing group for the service.
Balance Group: Enter the balance group for the service.
Charge Basis: Select the Consumption Surcharge. With this calculation, the system determines the usage of the meters selected and then calculates the surcharge by multiplying the surcharge rate and the usage.
Surcharge Rate: Enter the surcharge rate that should be applied.
First Meter No: The system has the capability of maintaining meters for different services (gas, water or electric) for each customer. This field indicates the first meter number that is associated with this service. For example, if the system bills both water and electric, the user may define meter numbers 1 through 99 as water and meter number 100 through 199 as electric.
Last Meter No: The system has the capability of maintaining meters for different services (gas, water or electric) for each customer. This field indicates the last meter number that is associated with this service. For example, if the system bills both water and electric, the user may define meter numbers 1 through 99 as water and meter number 100 through 199 as electric.
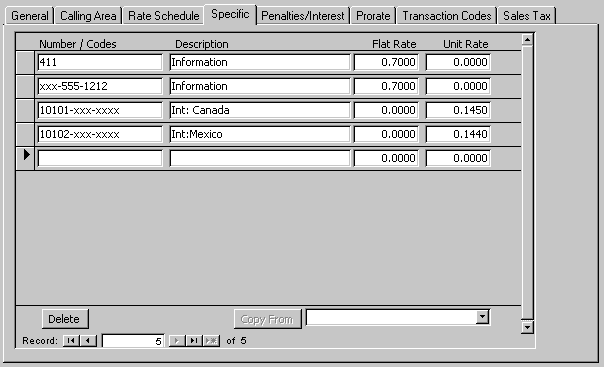
This window allows the user identify rate charges for specific numbers or codes. For example, this would be used to identify the rates for specific numbers such as Inforamation or specific codes such as international calls.
Number/Codes: Enter the number or code. The user may enter the field exactly as it appears or use an Ďxí as a wildcard character. For example, the rate line in the window above indicating a call to xxx-555-1212 would charge the customer $0.70 per call for any Information call, regardless of area code.
Description: Enter a description of the rate. This field is for documentation purposes only and is not used by the system for any other purpose.
Flat Rate: Enter the flat rate per call that is to be charged to the customer.
Unit Rate: Enter the unit rate (minute) that is to be charged to the customer. If the field is set to zero (0) and the call is considered a long distance call, then the system will apply any applicable long distance call charges based upon other services.
![]() If the user wishes to delete an area code from the list, the small delete button must be selected. If the large delete button at the bottom of the screen is selected, the total record will be deleted.
If the user wishes to delete an area code from the list, the small delete button must be selected. If the large delete button at the bottom of the screen is selected, the total record will be deleted.
![]() The system provides the user with the capability to copy specific numbers/code records that have been entered for another service to the current service. To use this function, select the service that is to be used as the source from the list provided and the select the COPY FROM button. The system will display the records after they have been copied. If some of the specific numbers/code in the source service already exist in the current service, the system will display a message and abort the process.
The system provides the user with the capability to copy specific numbers/code records that have been entered for another service to the current service. To use this function, select the service that is to be used as the source from the list provided and the select the COPY FROM button. The system will display the records after they have been copied. If some of the specific numbers/code in the source service already exist in the current service, the system will display a message and abort the process.
Because of the structure of the form, the user may not user the standard COPY/PASTE feature of Windows to transfer records from another service.
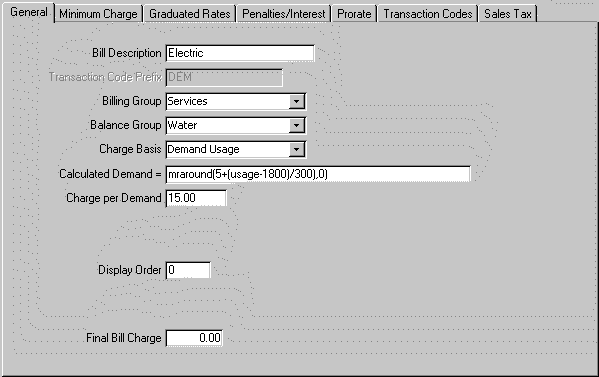
Description: Enter the description of the service. This desciption will be displayed on forms and reports when the service is referenced.
Bill Description: Enter the description that is printed on the bill. This description is typically short and concise to optimize space on the bill.
Transaction Code Prefix: The system automatically creates a set of transaction codes associated with the service. These transaction codes provide the link to the general ledger for the various functions associated with each service; e.g. bill, payment, sales tax.
Billing Group: Enter the billing group for the service.
Balance Group: Enter the balance group for the service.
Charge Basis: Select the demand usage. This basis will charge for consumption as well as an additional charge based upon the factor calculated by the system using the formula provided.
Calculated Demand =: Enter the formula to be used by the system to calculate the demand factor. The formula will be evaluated exactly as it is entered and will substitute the actual usage in the formula every time the term usage appears in the formula. Note: The system will require the word usage to appear at least once in the formula.
It is most likely that the user will require assistance from technical support to guarantee correct syntax of the formula. The formula may include functions such as INT() or mraRound(n,d).
Charge per Demand: Enter the amount that will be multiplied by the calculated demand factor to determine the base charge for this service. If the charge per demand is a function of meter size, then enter zero (0) in this field and enter the charge per demand on the Minimum Charges tab.
Display Order: The system will use this value to determine the order of displaying the service charges on the bill.
Final Bill Charge: Enter the amount that represent any charge that is applied when the customerís account is closed. This amount will automatically be added to the calculated charge and is included in the total amount. It will be credited to the service revenue account.