Menu Path: Customer
The primary display of the system is the Customer Account window. It can be displayed by selecting the ![]() button on the menubar. All information associated with the customer is available from this window. The user has two options for retrieving a customer account. First, if the account number is known, the user may use the Get button. Second, if the account number is not known, the user may locate the account by some other piece of information such as address, customer name, telephone, etc., using the Scan button.
button on the menubar. All information associated with the customer is available from this window. The user has two options for retrieving a customer account. First, if the account number is known, the user may use the Get button. Second, if the account number is not known, the user may locate the account by some other piece of information such as address, customer name, telephone, etc., using the Scan button.
![]() Each of the tabs across the top and the buttons on the right side of the window below are active to assist the user is reviewing the help documentation. To change the view of the window, select the tab or button of interest. To return to this window, select the Back button on the menubar.
Each of the tabs across the top and the buttons on the right side of the window below are active to assist the user is reviewing the help documentation. To change the view of the window, select the tab or button of interest. To return to this window, select the Back button on the menubar.
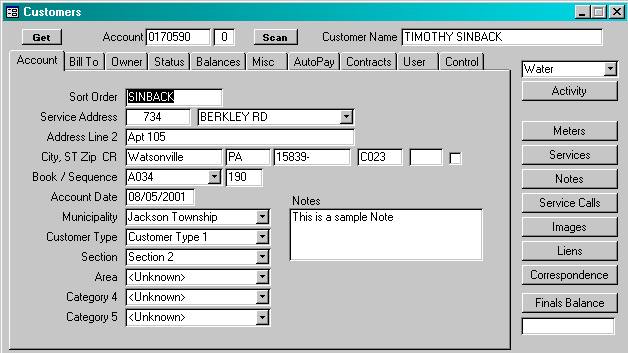
Account: Enter the Account that is assigned to the customer’s account. The Account can have no more than 50 characters and may include any combination of letters and numbers. This Account is permanently assigned to the service address and must be unique. It does not change as customers move in and out. The movement of customers is managed with the Account Suffix.
If the system is to generate the next available account number, the account number must be numeric. To get the next available account number, double-click on the account number field in the Add New Service Address function.
Account Suffix: The Account Suffix is a system-maintained field and is used to maintain the history of customers at a given service address. The current customer/Accounts always has an Account Suffix of ‘0’ (zero). When that customer moves out and the account is finalized, a copy of the account information is created and the account suffix is assigned a letter. After the first final account, the system would display two complete accounts, the active account with an Account Suffix of ‘0’ and the first final account, with an Account Suffix of ‘A’. Using this scheme, a complete history of final accounts is maintained.
Customer Name: Enter the customer’s name as is would appear on the bill, e.g. Robert A. Miller. On existing records, the system will not allow the user to change the customer’s name without double-clicking on the Customer Name field first. This is to prevent changing the name accidentally.
Sort Order: Enter the last name of the customer or the company name in this field. This field is used to prepare lists in alphabetical order
Service Address: Enter the number portion of the service address in the first field and the street portion of the service address in the second field. The street name is selected from a list of streets maintained in the Street Names table. By standardizing the entry of the street names, sorting and grouping accounts by street is possible.
Address Line 2: Enter the portion of the address that should appear on a second address line. This would include information such as apartment numbers, suite numbers, etc.
City, St Zip: Enter the city, state and zip code for the service address. If this information has been entered on the Street Names table, then the system will automatically display this information when the street name is entered.
CR, PostNET The carrier route and postnet code are required to print a postnet barcode on the bills and to optimize postage savings. These fields are typically system-maintained and are updated as part of the Address Scrubbing process.
Book/Sequence: Enter the book number in the first field and sequence number in the second field. The book numbers are selected from a list of book numbers maintained in the Books table. When readings are entered, the entry window displays in book/sequence order, based upon this being the order that the meters are read. Note: if the user does have books, at least one book must be entered for all of the accounts.
Account Date: Enter the date upon which the customer assumed responsibility for the service address. The system uses this date in prorating charges when the customer first moves in or moves out.
Municipality: Enter the municipality in which the account is located. The Municipality is selected from a list that is maintained in the Municipalities table.
User-Defined Category: To accommodate unique information required by the user, the system maintains five fields that are defined by the user. In the window displayed, these fields are labeled ‘Customer Type, ‘Section’, ‘Area’, ‘Category 4’ and ‘Category 5’. The user defines their own labels in the Parameters table. When entering information in these fields, the user selects from a list of options that are also user defined. These options are maintained by the user on the Codes table.
Notes: Enter any information that should be associated with the customer’s account. This note is used for internal purposes only and is not displayed on the bill.
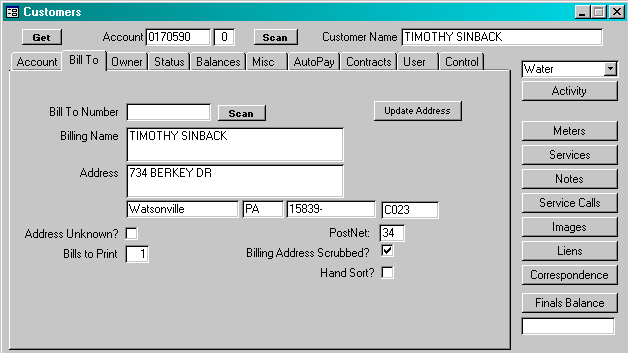
The system maintains a separate billing address from the service address. It most instances, the billing address and service address will be the same, but there are those cases where they will be different. The user has three options when entering the billing address. First if the service address and the billing address are the same, the user selects the ![]() . This will transfer the service address information to the billing address. Second, the user may enter the billing address directly on this window. Third, the user may reference and existing record on the Owner/Bill To table through the Bill To Number. If this is done, the system will transfer the billing address from the Owner/Bill To table.
. This will transfer the service address information to the billing address. Second, the user may enter the billing address directly on this window. Third, the user may reference and existing record on the Owner/Bill To table through the Bill To Number. If this is done, the system will transfer the billing address from the Owner/Bill To table.
Bill To Number: If the user wishes to reference the Owner/Bill To table, enter the number of the record from the Owner/Bill To table that is appropriate. This field may be left blank.
Billing Name: Enter the billing name as it should appear on the bill. The system allows the user to enter more than one line on the billing name. If a second line is required, enter {alt}{Enter} move the cursor to a second line in the billing name.
Address: Enter the billing address as it would appear on the bill. If a second line is required, enter {alt}{Enter} move the cursor to a second line in the billing address.
City, St Zip: Enter the city, state and zip code for the billing address.
CR, PostNet: The carrier route and postnet code are required to print a postnet barcode on the bills and to optimize postage savings. These fields are typically system-maintained and are updated as part of the Address Scrubbing process.
Billing Address Scrubbed: This is typically and system-maintained field and indicates whether the address has been scrubbed and qualifies for CASS certification
Hand Sort?: This is typically a system-maintained field and indicates how the bill for this customer should be sorted. When bills are printed, they are sorted by the Hand Sort field, Zip Code, Carrier route and then Account Number. Bills that do not have CASS certification are separated from those that do by the Hand Sort field. If the billing address has CASS certification, the Hand Sort box will not be checked. Using this scheme, the system separates those bills that qualified for discount postage rates from those that do not.
The Hand Sort field can also be set by the user for those bills that require special processing. If the user checks this box, the system will print the bills in the first section of bills. This could be done when the user needs to mail copies of bills together or wishes to pull the bills from the total print run for some reason.
Address Unknown: Check this box if the bill or correspondence has been returned ‘ Addressee Unknown’. This field is typically used on final accounts to remove the account from delinquent notices and other correspondence that may be sent in the future.
Bills To Print: Enter the number of bills that should be printed for the customer during each bill run. Typically, the value of this field is set to 1. If more than one bill is printed, the user may elect to check the Hand Sort box so that the bills are printed in the first section.
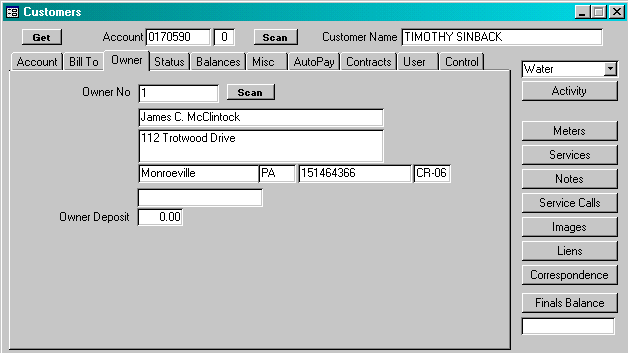
Owner No: Enter the owner number that is the key to the appropriate record on the Owner/Bill To table. When the field is entered, the system will display the owner information.
Owner Deposit: Enter the amount of the owner deposit, if one is collected.
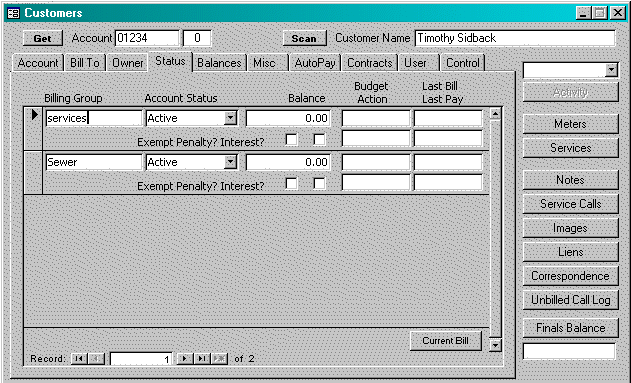
All information on this window is system-maintained. A record is displayed for each billing group that is appropriate for the customer. Billing Groups are defined for the customer based upon the services that are associated with the customer. A detailed discussion of billing groups, balance groups and services may be found in the Critical Concepts section of this documentation.
Billing Group: Displays the billing group name
Account Status: Indicates the current status of the customer with regard to this billing group. A detailed discussion of the Account Status may be found in the Critical Concepts section of this documentation.
Balance: Indicates the total balance due for this billing group.
Budget Action Date: If this account has a ‘Budget’ account status, this indicates the next date upon which the customer must act to maintain good standing with regard to budget payment arrangements that have been made.
Delinquent Action Date: If the account is delinquent, this field indicates the date upon which the next action will be taken on the account unless payment is made. This date is assigned by the user as part of the Delinquent Notices process.
Last Bill Date: Indicates the date the last bill was prepared.
Last Payment Date: Indicates the date the last payment was received.
Penalty Exempt: Check this box if the customer is not to receive penalty charges on this billing group.
Interest Exempt: Check this box if the customer is not to receive interest charges on this billing group.
![]() If the user selects this button, the system will display the current billing information for the selected billing group. The customer’s book must be in some stage of the billing process; after the billing period has been opened and before the billing period has been closed.
If the user selects this button, the system will display the current billing information for the selected billing group. The customer’s book must be in some stage of the billing process; after the billing period has been opened and before the billing period has been closed.
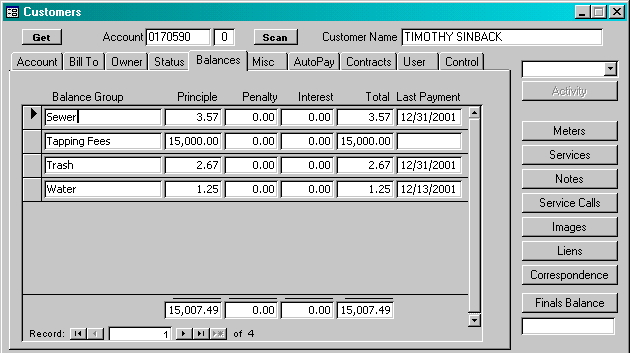
All information on this window is system-maintained. A record is displayed for each billing group that is appropriate for the customer. Balance Groups are defined for the customer based upon the services that are associated with the customer. A detailed discussion of billing groups, balance groups and services may be found in the Critical Concepts section of this documentation.
Balance Group: Displays the balance group name
Principle: Indicates the principle due for this balance group.
Penalty: Indicates the penalty amount due for this balance group.
Interest: Indicates the interest amount due for this balance group.
Total: Indicates the total due for this balance group.
Last Payment: Indicates the date the last payment was received.
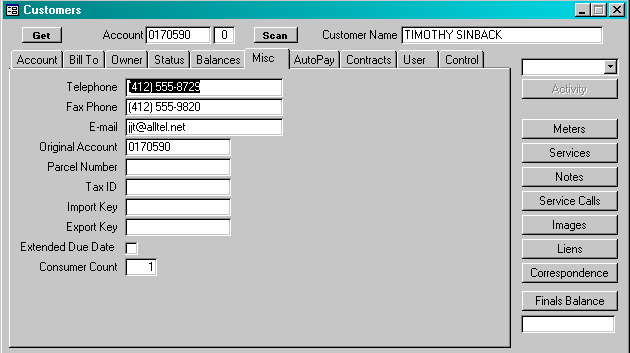
This window displays miscellaneous information that is maintained by the user. All information on this window is optional.
Telephone: Enter the customer’s telephone number.
Fax Phone: Enter the customer’s fax telephone number.
E-mail: Enter the customer’s email address
Original Account: If the data for this system has been converted from an automated system, this field represents the account number from the prior account.
Parcel Number: Enter the parcel number assigned to the service address.
Tax ID: Enter the TAX ID assigned to the service address.
Import Key: If meter readings are imported on a regular basis from another automated system, this field represents the key that is used by the other system to identify the customer account.
Export Key: If meter readings are exported on a regular basis to another automated system, this field represents the key that is used by the other system to identify the customer account.
Extended Due Date: If this box is checked, the extended due date that is defined when the bills are printed is assigned to the customer’s bill.
Consumer Count: Enter the number of consumers that live at the service address. When opening an account, the consumer count is multipled by the average consumer consumption to determine the average consumption.
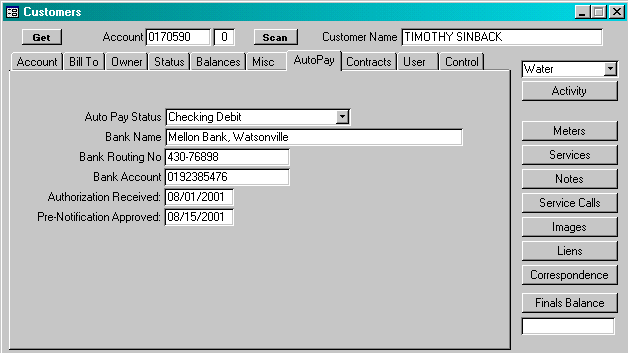
The system has the capability of generated a file that can be submitted to the user’s bank to authorize automatic payment of bills. The file is created in the standard ACH (Automated Clearing House) format. Withdrawals can be made from the customer’s checking or savings account. To review a detailed description of the Autopay procedure, click here.
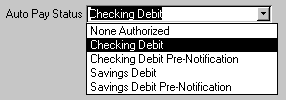 Autopay Status: Enter the appropriate Autopay status. Initially, the status should be set to one of the Prenotification options. One approval has been received from the bank to begin automated withdrawals, the system will change the status accordingly.
Bank Name: Enter the name of the customer’s bank. This is for documentation purposes only and is not used by the system.
Bank Routing Number: Enter the Bank Routing Number as it appears on the customer check. Do not include any non-numeric symbols such as ‘-‘ in the input.
Bank Account: Enter the Bank Account number as it appears on the customer’s check.
Authorization Received: Enter the date the user originally received authorization from the customer to activate Autopay.
Pre-Notification Approved: Enter the date the user received approval from the bank to activate automated withdrawals.

Contract Number: Enter a contract number. This is typically an agreement with the customer to assume responsibility for payment of all charges. The field is optional.
Customer Deposit: If a customer deposit is required to activate a new account, enter the deposit amount collected.
Deposit Control Number: Enter a deposit control number. This is typically a number assigned to the deposit for tracking purposes. The field is optional.
Deposit Received Date:
Deposit Returned Date:
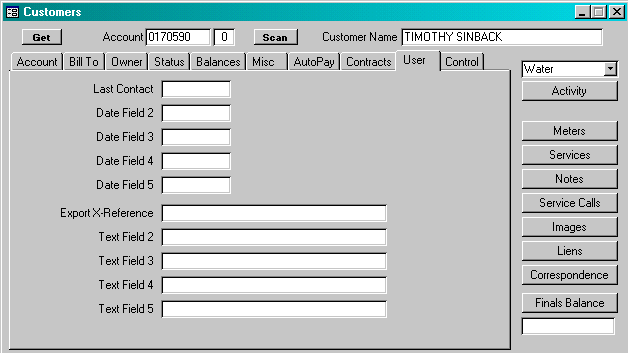
This window displays five date fields and five text fields that can be defined by the user. The user enters the label for each of the fields in the Parameters table. Those labels will then be displayed anywhere in the system where the field is referenced.
Date Fields: Enter the date associated with the label. The date input will be limited to mm/dd/yyyy.
Text Fields: Enter up to 255 characters for each text field. Any character or number will be accepted by the system.
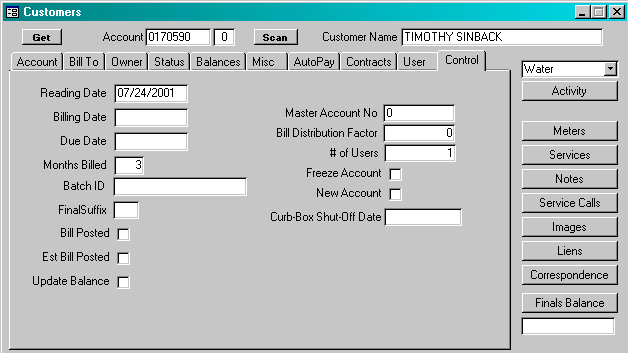
The fields on this window are system-maintained and related generally to the processing of final bills. The window is available in case there are any issues with system processing. The window also include field information that is associated with exceptional billing processes.
Reading Date: Enter the reading date in the format mm/dd/yyyy.
Billing Date: Enter the billing date in the format mm/dd/yyyy.
Due Date: Enter the bill due date in the format mm/dd/yyyy.
Months Billed: Enter the number of months billed in the billing cycle for this bill. The system will use this number to prorate the final bill.
Batch ID: Enter the batch id assigned to this customer for the final bill.
Final Suffix: Enter the new account suffix that will be assigned to the closed account.
Bill Posted: Check the box if the final bill has already been posted.
Estimated Bill Posted: Check the box if an estimated bill has been posted.
Update Balance: Check the box if the system is to update the customer’s balance. This process is performed after every posting procedure to insure that the Billing Group balances, Balance Group balances and transaction detail are all synchronized.
Master Account No: Not activated in this version. The intent of this field is to group any number of accounts together for purposes of billing as a single customer.
Bill Distribution Factor: Not activated in this version. The intent of this field is to provide a multiplication factor for purposes of billing minimum charges even though a single meter is used. For example, a building with six apartments would pay six times the minimum meter charge even though only one meter is used for the entire building.
# of Users: Not activated in this version.
Freeze Account: If this box is checked, then this account is identified as an account that has problems with freezing lines in cold temperatures.
New Account: When the account is assigned a new customer, the New Account box will be checked. It will stay checked until a New Account List has been printed and the system is directed to uncheck the box.
Curb_Box Shut-Off Date: When the user elects to create service calls to check curb boxes that should be shut-off the system sets this field to the assigned date.
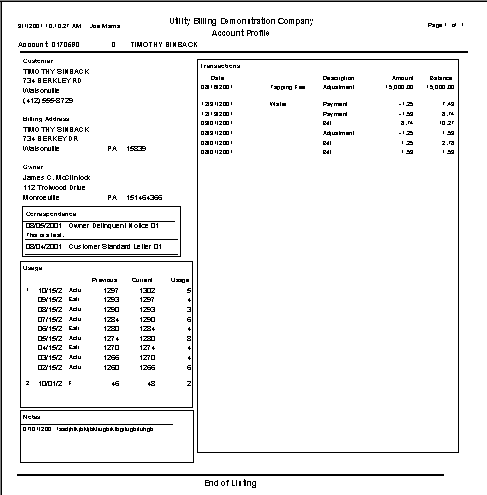
This report is a summary of the customer’s account. The report includes the critical addresses, notes, correspondence, usage history and transaction history.
