Menu Path: Customer
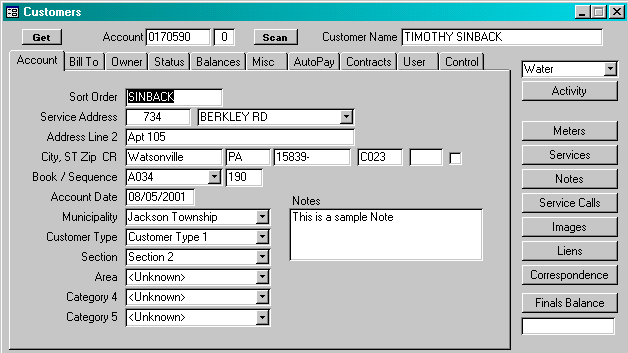
The primary display of the system is the Customer Account window. It can be displayed by selecting the ![]() button on the menubar. All information associated with the customer is available from this window. The user has two options for retrieving a customer account. First, if the account number is known, the user may use the Get button. Second, if the account number is not known, the user may locate the account by some other piece of information such as address, customer name, telephone, etc., using the Scan button.
button on the menubar. All information associated with the customer is available from this window. The user has two options for retrieving a customer account. First, if the account number is known, the user may use the Get button. Second, if the account number is not known, the user may locate the account by some other piece of information such as address, customer name, telephone, etc., using the Scan button.
![]() Each of the tabs across the top and the buttons on the right side of the window below are active to assist the user is reviewing the help documentation. To change the view of the window, select the tab or button of interest. To return to this window, select the Back button on the menubar.
Each of the tabs across the top and the buttons on the right side of the window below are active to assist the user is reviewing the help documentation. To change the view of the window, select the tab or button of interest. To return to this window, select the Back button on the menubar.

Account: Enter the Account that is assigned to the customer’s account. The Account can have no more than 50 characters and may include any combination of letters and numbers. This Account is permanently assigned to the service address and must be unique. It does not change as customers move in and out. The movement of customers is managed with the Account Suffix.
If the system is to generate the next available account number, the account number must be numeric. To get the next available account number, double-click on the account number field in the Add New Service Address function.
Account Suffix: The Account Suffix is a system-maintained field and is used to maintain the history of customers at a given service address. The current customer/Accounts always has an Account Suffix of ‘0’ (zero). When that customer moves out and the account is finalized, a copy of the account information is created and the account suffix is assigned a letter. After the first final account, the system would display two complete accounts, the active account with an Account Suffix of ‘0’ and the first final account, with an Account Suffix of ‘A’. Using this scheme, a complete history of final accounts is maintained.
Customer Name: Enter the customer’s name as is would appear on the bill, e.g. Robert A. Miller. On existing records, the system will not allow the user to change the customer’s name without double-clicking on the Customer Name field first. This is to prevent changing the name accidentally.
Sort Order: Enter the last name of the customer or the company name in this field. This field is used to prepare lists in alphabetical order
Service Address: Enter the number portion of the service address in the first field and the street portion of the service address in the second field. The street name is selected from a list of streets maintained in the Street Names table. By standardizing the entry of the street names, sorting and grouping accounts by street is possible.
Address Line 2: Enter the portion of the address that should appear on a second address line. This would include information such as apartment numbers, suite numbers, etc.
City, St Zip: Enter the city, state and zip code for the service address. If this information has been entered on the Street Names table, then the system will automatically display this information when the street name is entered.
CR, PostNET The carrier route and postnet code are required to print a postnet barcode on the bills and to optimize postage savings. These fields are typically system-maintained and are updated as part of the Address Scrubbing process.
Book/Sequence: Enter the book number in the first field and sequence number in the second field. The book numbers are selected from a list of book numbers maintained in the Books table. When readings are entered, the entry window displays in book/sequence order, based upon this being the order that the meters are read. Note: if the user does have books, at least one book must be entered for all of the accounts.
Account Date: Enter the date upon which the customer assumed responsibility for the service address. The system uses this date in prorating charges when the customer first moves in or moves out.
Municipality: Enter the municipality in which the account is located. The Municipality is selected from a list that is maintained in the Municipalities table.
User-Defined Category: To accommodate unique information required by the user, the system maintains five fields that are defined by the user. In the window displayed, these fields are labeled ‘Customer Type, ‘Section’, ‘Area’, ‘Category 4’ and ‘Category 5’. The user defines their own labels in the Parameters table. When entering information in these fields, the user selects from a list of options that are also user defined. These options are maintained by the user on the Codes table.
Notes: Enter any information that should be associated with the customer’s account. This note is used for internal purposes only and is not displayed on the bill.

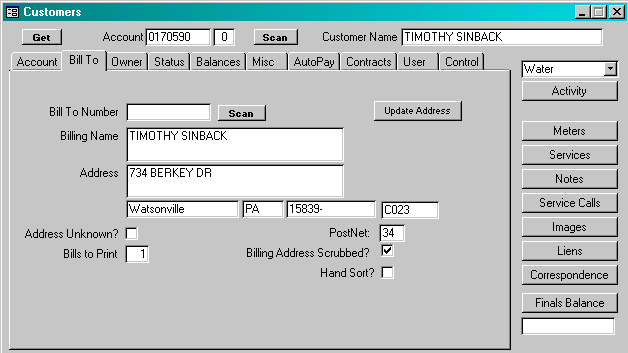
The system maintains a separate billing address from the service address. It most instances, the billing address and service address will be the same, but there are those cases where they will be different. The user has three options when entering the billing address. First if the service address and the billing address are the same, the user selects the ![]() . This will transfer the service address information to the billing address. Second, the user may enter the billing address directly on this window. Third, the user may reference and existing record on the Owner/Bill To table through the Bill To Number. If this is done, the system will transfer the billing address from the Owner/Bill To table.
. This will transfer the service address information to the billing address. Second, the user may enter the billing address directly on this window. Third, the user may reference and existing record on the Owner/Bill To table through the Bill To Number. If this is done, the system will transfer the billing address from the Owner/Bill To table.
Bill To Number: If the user wishes to reference the Owner/Bill To table, enter the number of the record from the Owner/Bill To table that is appropriate. This field may be left blank.
Billing Name: Enter the billing name as it should appear on the bill. The system allows the user to enter more than one line on the billing name. If a second line is required, enter {alt}{Enter} move the cursor to a second line in the billing name.
Address: Enter the billing address as it would appear on the bill. If a second line is required, enter {alt}{Enter} move the cursor to a second line in the billing address.
City, St Zip: Enter the city, state and zip code for the billing address.